Google Workspace Integration Guide
Last updated: April 22, 2026
Google Workspace integration is configured from the instance settings and is used to support Google Workspace cloud scanning for Data Scans.
To begin setup:
In the instance, go to Settings.
Select the Integrations tab.
On the Google Workspace row, click Configure.
This opens the Google Workspace Configuration drawer, where you can enter the required Google Workspace API credential details, including:
Project ID
Private Key
Delegated Service Email
Domain Service Email
Google Security File (JSON upload)
After entering the required information, use Verify Credentials to validate the configuration before selecting Submit.

Access to Google Cloud by the Cyrisma agent is enabled via a JSON security file provided by Google. The overview steps to generate this file are shown here:
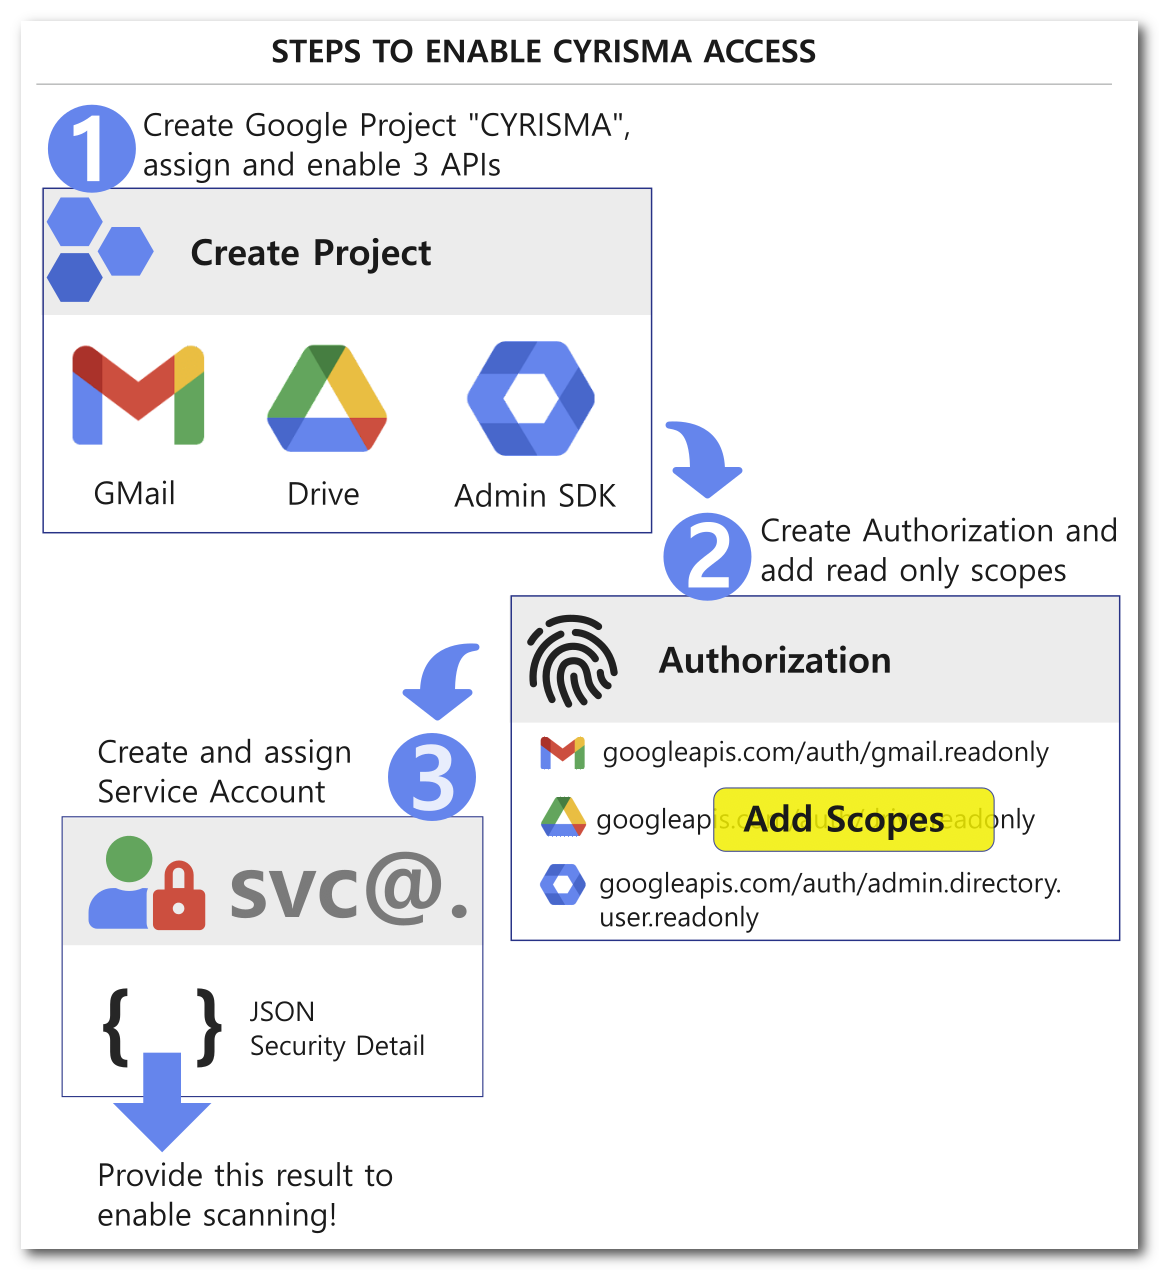
With the above overview in mind, follow the detailed guide below to generate the JSON security file.
1. CREATE API PROJECT
- Visit cloud.google.com. and use the dropdown in the top left menu to create a new project.
- On the New Project Page, choose a name for the project that begins with "Cyrisma". Google will help select a unique name for the project.
Choose a Project name such as Cyrisma12345
Select your Organization for the project
Select your Parent Organization under Location
Hit Create and wait for Google to finish

- On the left menu, navigate to APIs & Services -> Library to open the APIs and Services Library selection. Select the previous "Cyrisma" project if not already selected.
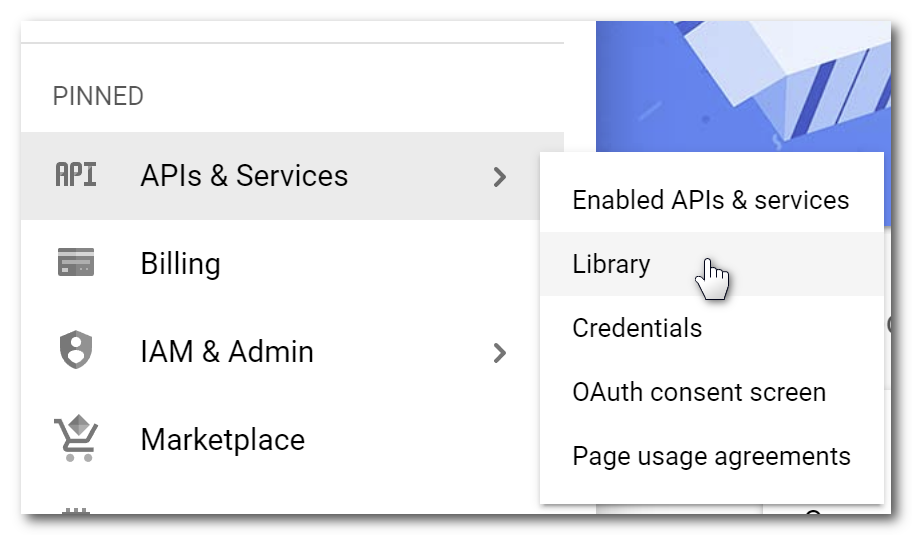
- Browse the Library (or use the search function) for these APIs:
Admin SDK API
Gmail API
Google Drive API
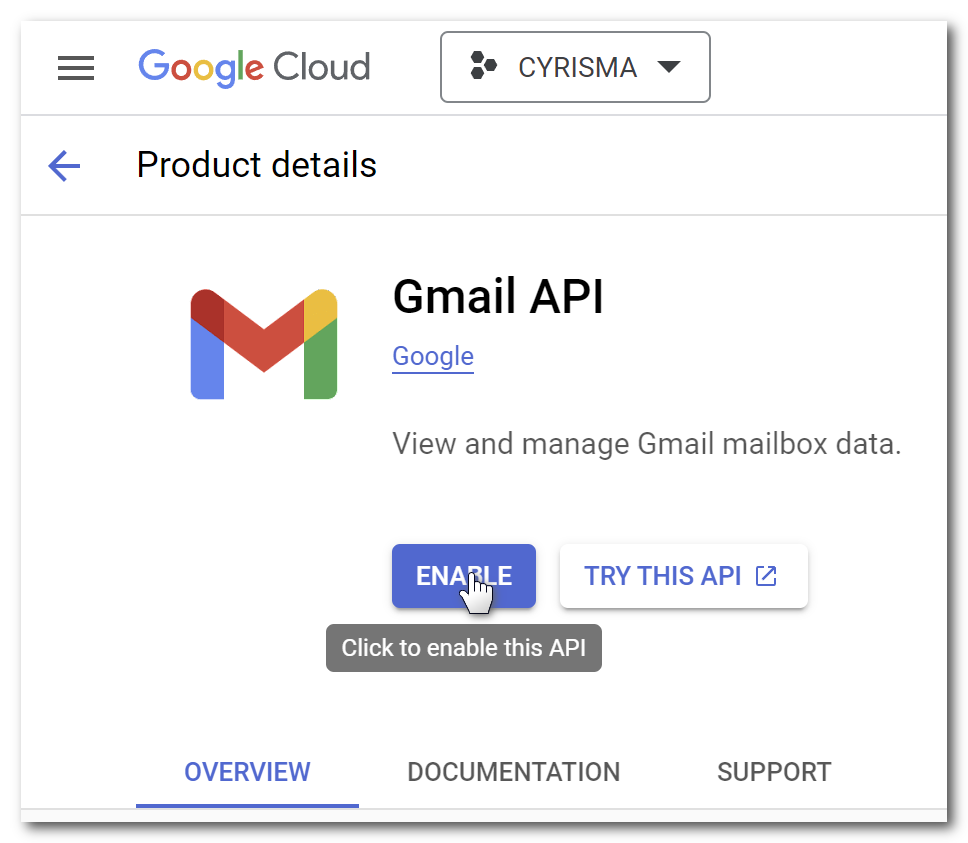
Enable each API for the project (Admin SDK, Gmail API, and Google Drive API) using these steps:
In the library, enable the first API
Return to the library and enable the next API until all three are enabled.
Use the ENABLE button shown here to enable:
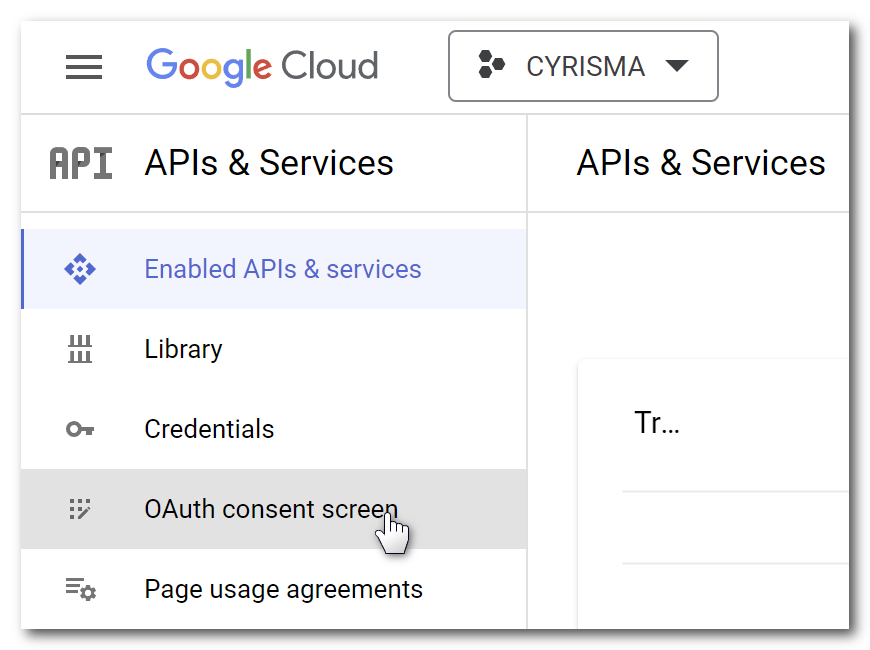
2. CREATE AUTHORIZATION
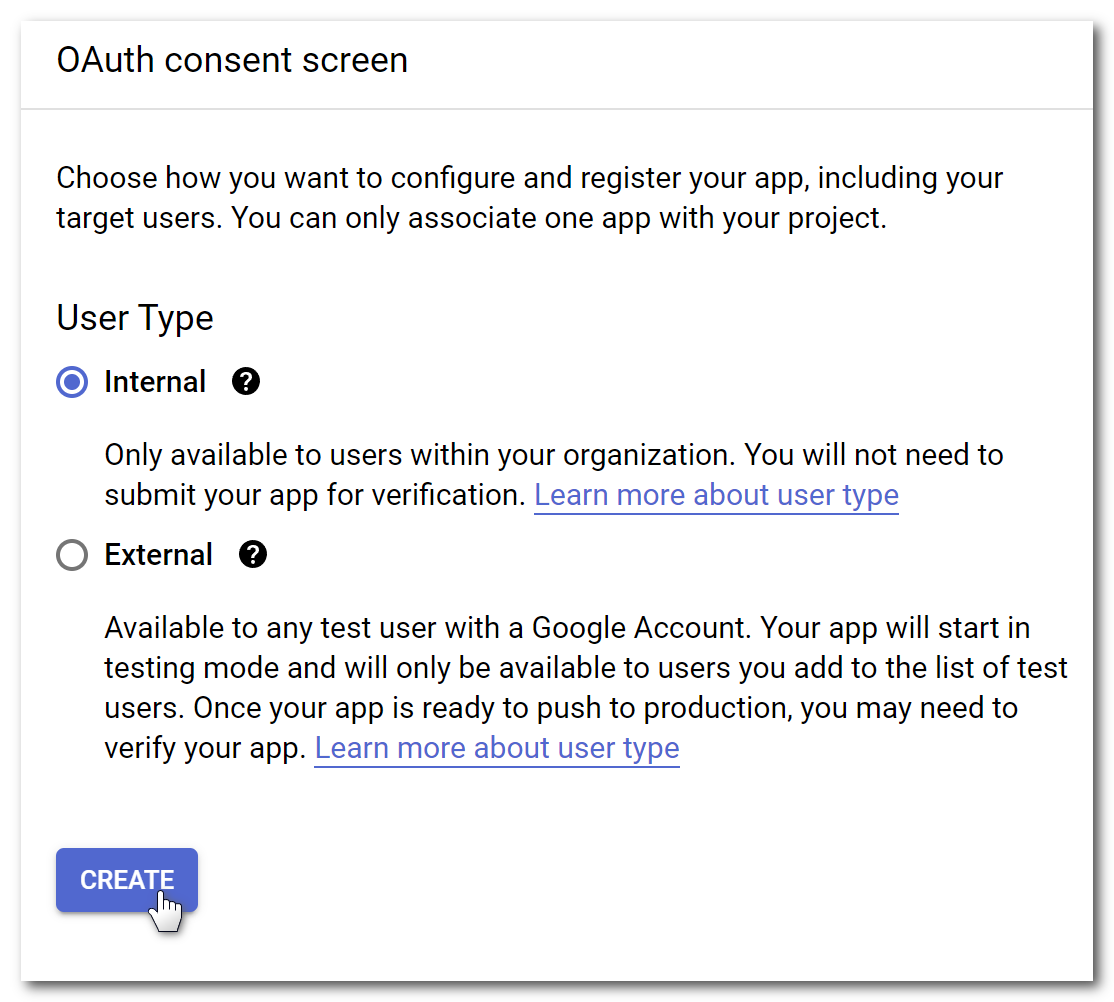
- Once all APIs are enabled, return to the APIs & Services dashboard and select "OAuth Consent Screen" from the left menu.
- On the OAuth Consent screen, select Internal and Create:
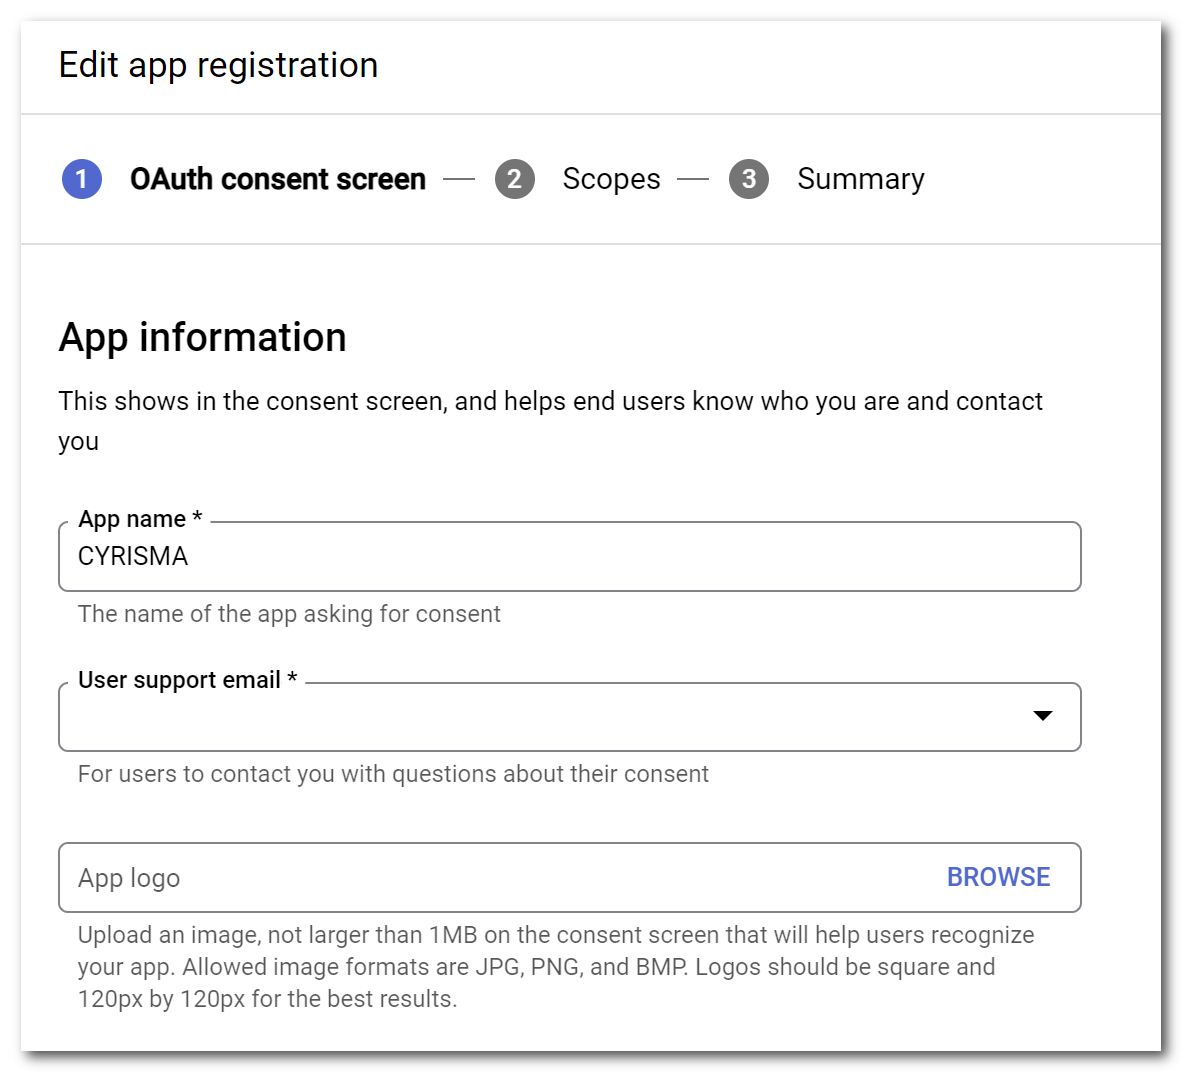
- Continue OAuth consent with step "1" and provide App name (Cyrismaxxxxx) and select the admin email address from the "User support email" dropdown.
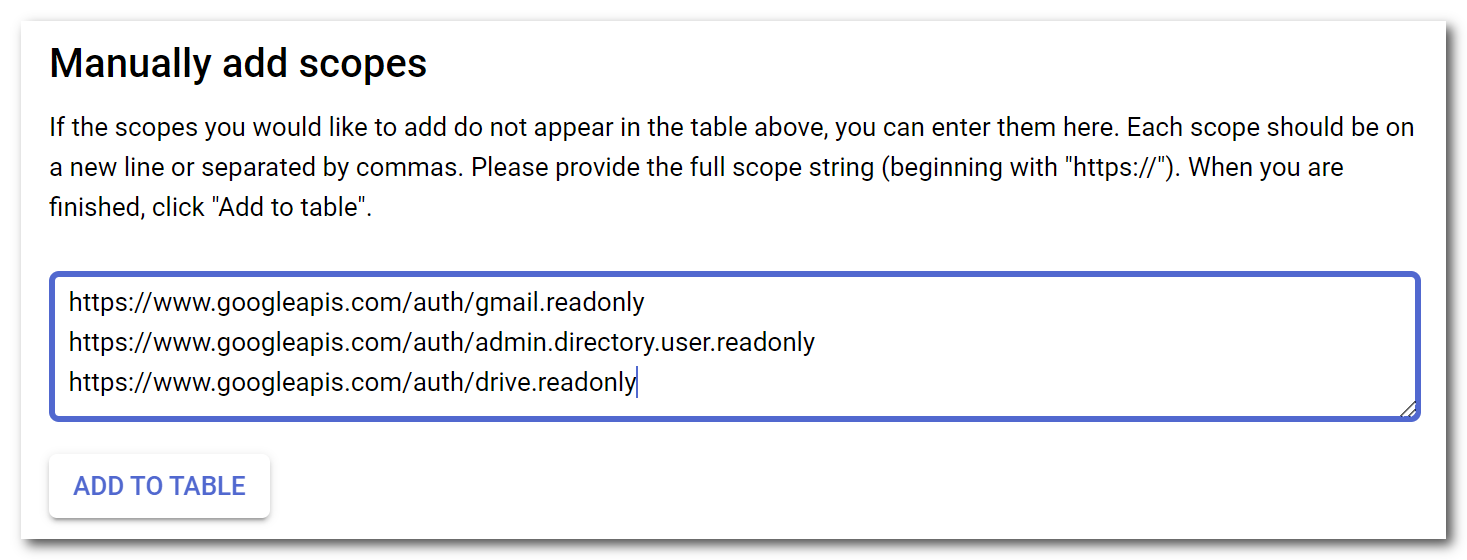
- On the next page, hit the "Add or Remove Scopes" button to add scopes to the project.
On the Update Selected Scopes page, near the bottom, copy and paste the following into the "Manual" section:
https://www.googleapis.com/auth/gmail.readonly
https://www.googleapis.com/auth/admin.directory.user.readonly
https://www.googleapis.com/auth/drive.readonly
- Hit the "Add to Table" button, which will auto-select these scopes in the scope list at the top:
Hit "Update" to add these scopes.
Once scopes have been added, on the Edit App Registration screen, select "Save and Continue"
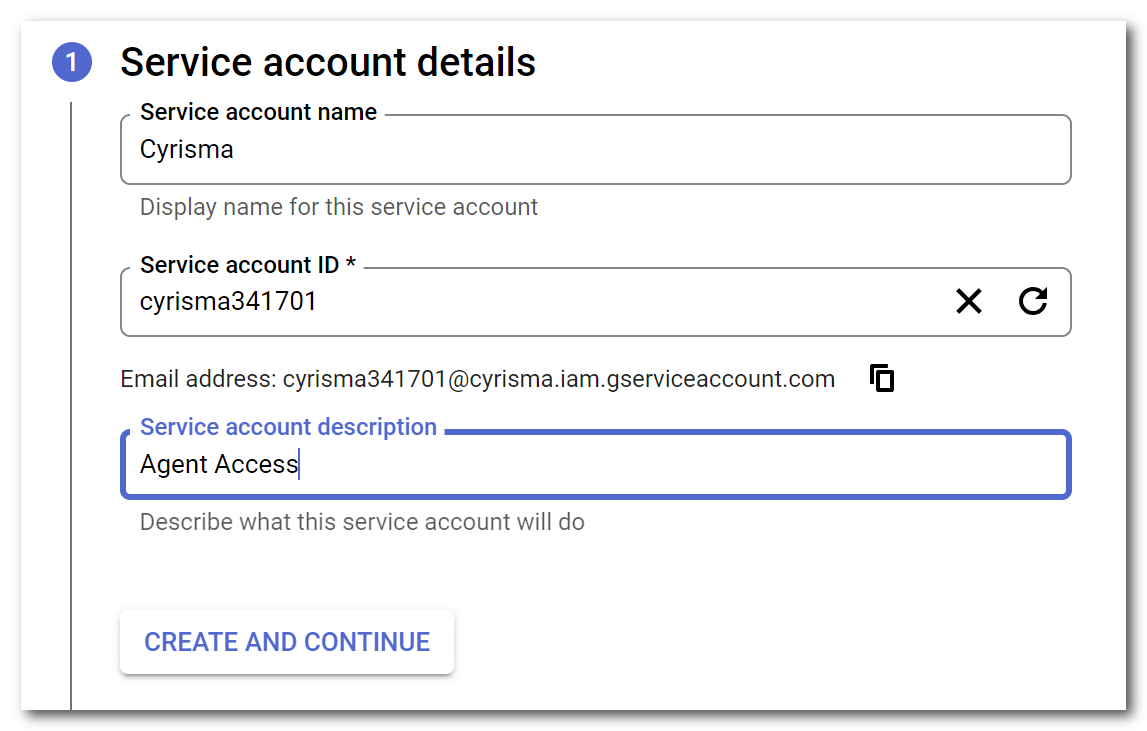
3. CREATE SERVICE ACCOUNT
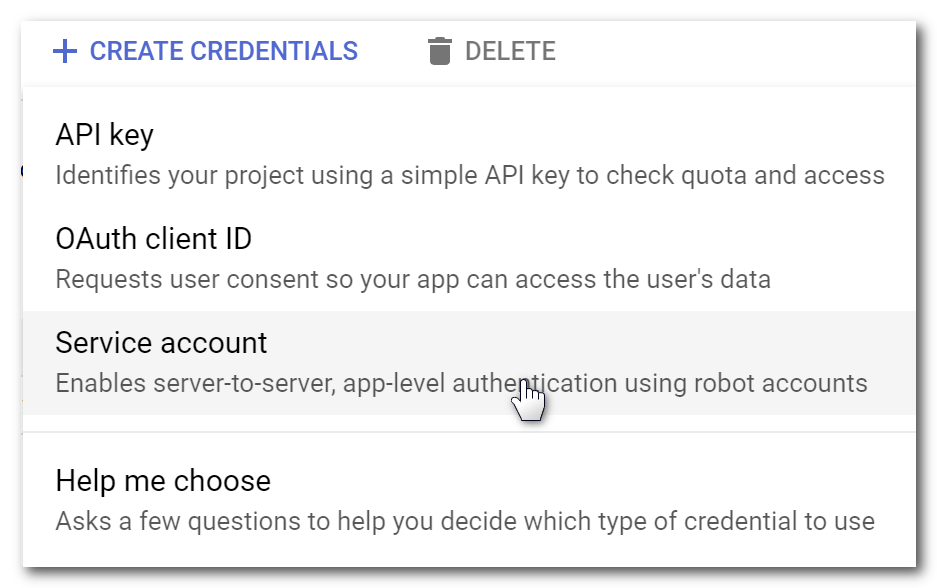
- From the APIs and Services menu, select "Credentials". To create the credential for the API, select "Service account":
Complete the fields:
Name the Service account "Cyrisma"
Use a unique address for the account ID, and Select "Create and Continue":
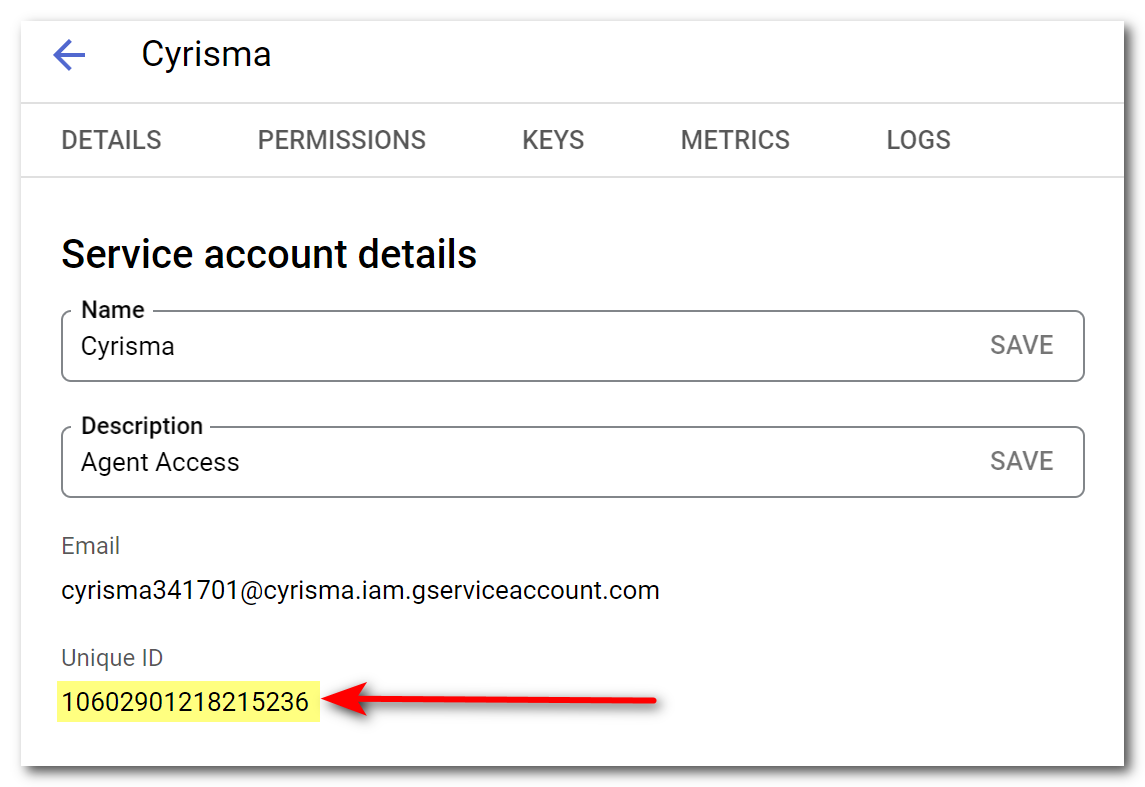
- At the bottom of the next Create Service account page, hit "Done" (optional fields may be left blank).
Follow the link to the newly created service account on the main credentials screen. Get the Unique Service Account ID as shown here:
- Follow the "Keys" menu link from the top menu. Hit "Add Key" - New Key... and select "JSON" and select "Create":
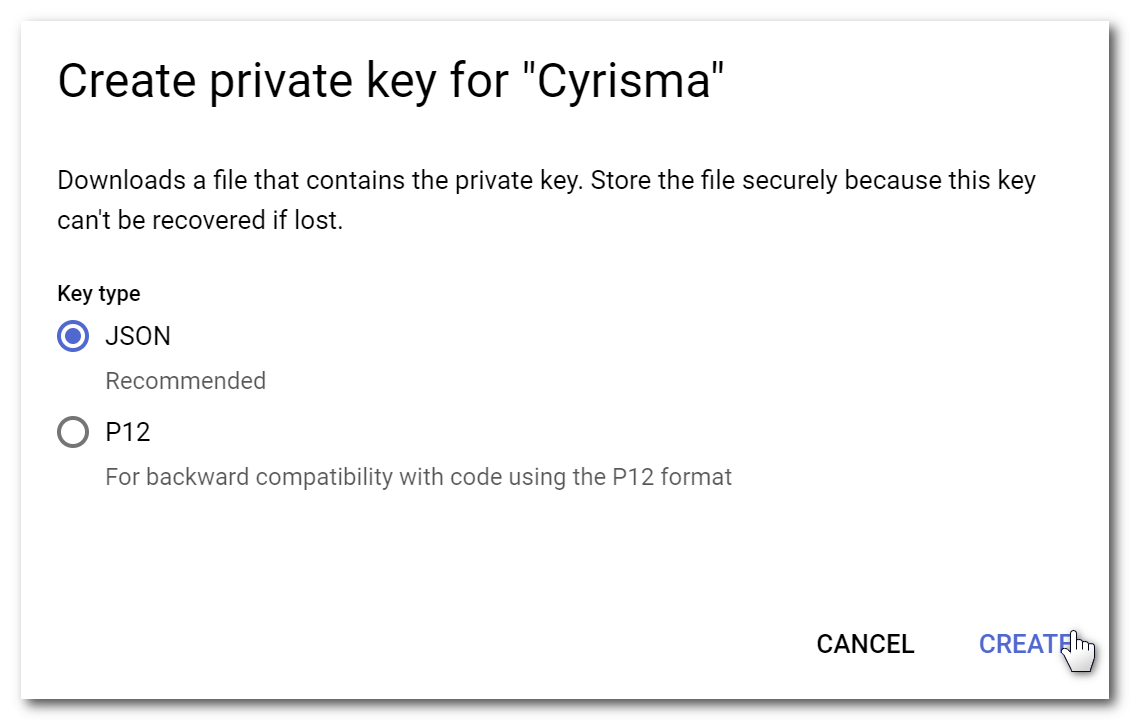
The browser will download the JSON files containing the authorization detail!
Note the name and location of the downloaded JSON authorization file; it will be needed later.
At this point, API access, scope, and Key generation are complete; now delegated access must be granted through the Google Admin Panel for the organization.
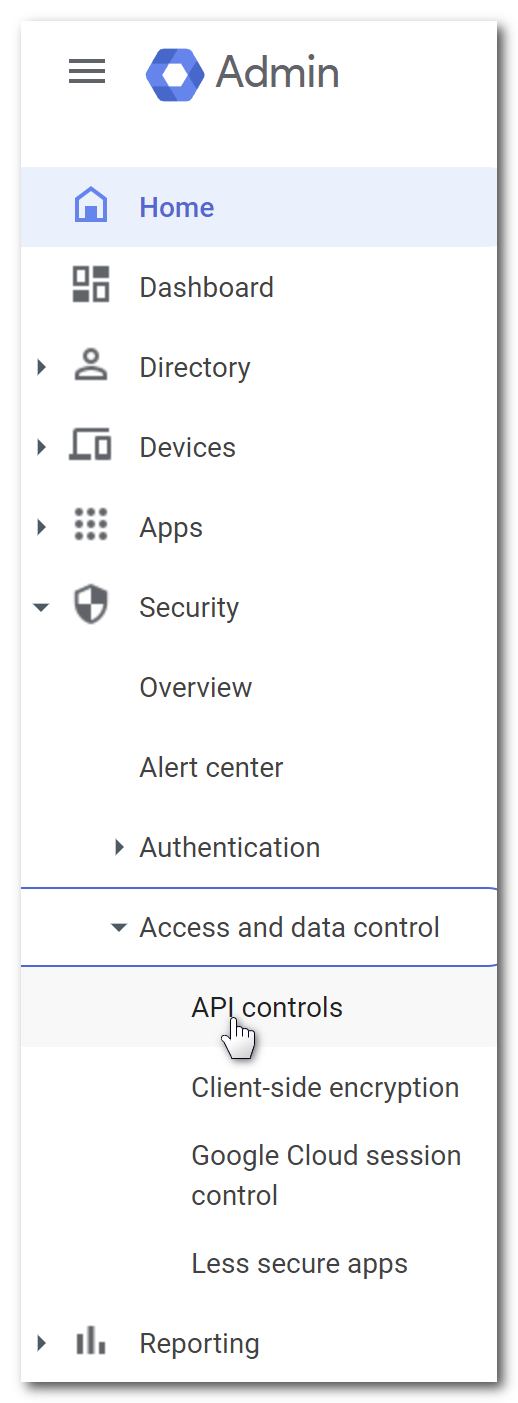
Visit admin.google.com.
From the Google Admin Home tab, navigate to the security tab in the left pane, expand the dropdown for Access and data control, and click API controls:
- In the Domain wide delegation box, click "MANAGE DOMAIN WIDE DELEGATION" at the bottom of the page.
Click "Add new" and use the Client ID (recorded earlier) from the previously configured service account:
Add the OAuth scopes selected earlier:
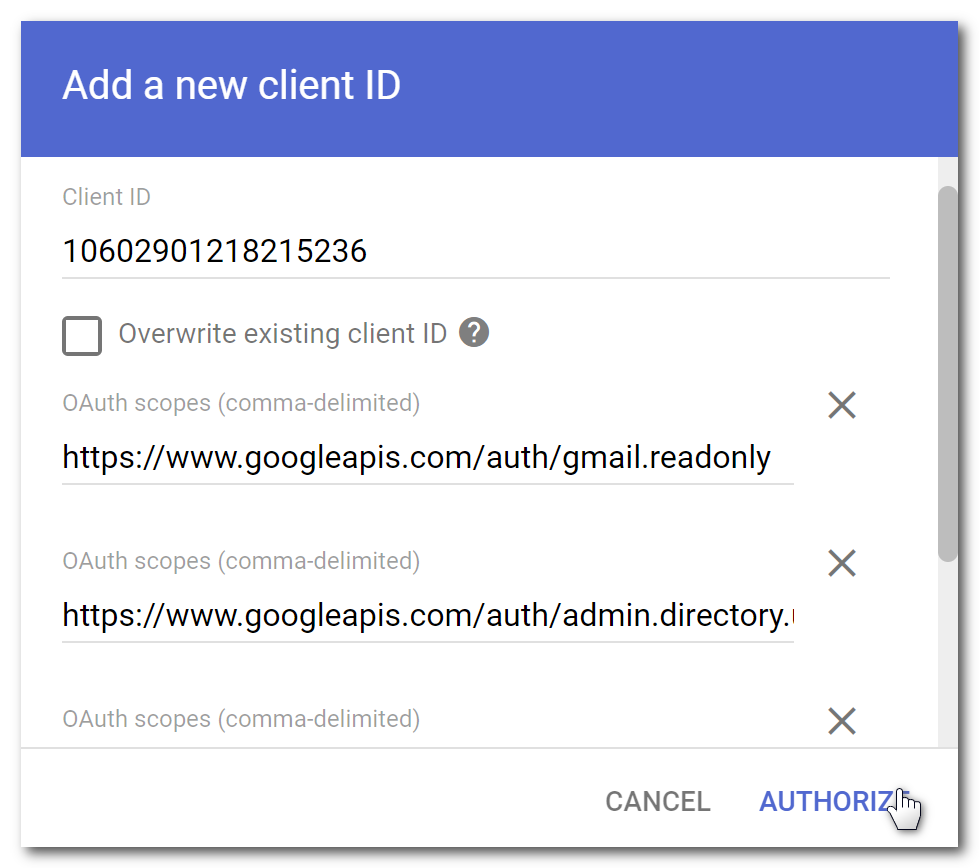
Select "Authorize" to complete the delegation.
- The API setup steps at Google are complete. The Cyrisma instance will use the private key created above (and contained in the downloaded JSON file) to access the granted scopes (Gmail mailboxes and Google Drive files) for the organization.
In the instance, go to Settings.
Select the Integrations tab.
On the Google Workspace row, click Configure.
In addition to the API security values included in the JSON file, the agent also requires an existing admin email address (as "Delegated Service Email" shown below). This address is needed when listing the accounts within the organization during data scan setup.