How to Configure an Authenticated External Web App Scan
Last updated: July 24, 2026
Overview
An External Web App scan checks an externally accessible website or web application for vulnerabilities.
Authentication allows Cyrisma to sign in with the account provided for the scan. This allows the scan to access pages and functionality that are available only to authenticated users. Without authentication, the scan can assess only the areas available without signing in.
Authentication is optional and is configured separately for each target URL. Up to five targets can be added to a scan.
Before You Begin
You will need:
The URL of the web application
The application’s login URL
A valid username and password
The field names or tokens used for the username and password in the login request
Optionally, a verification URL
Optionally, logged-in and logged-out indicators
The account must have access to the authenticated areas you want to scan.
Create an External Web App Scan
Go to Scanning.
Select New Scan.
Select Vulnerability Scan.
Select External Web App.
Add a Target
On the Configure Web Applications screen:
Enter the URL of the web application you want to scan, such as
msp.cyrisma.com.Select Add Auth next to the target.
To scan another application, select Add target. Authentication must be configured separately for each target.
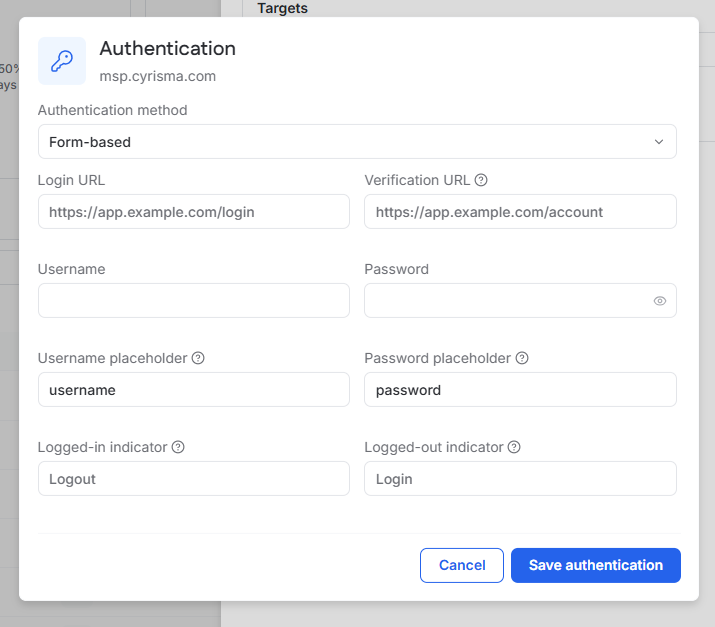
Configure Authentication
Authentication Method
Select the method used by the application’s login request:
Form-based: Select this when credentials are submitted through a web login form.
JSON-based: Select this when credentials are submitted in a JSON-formatted request.
Authentication Fields
Complete the following fields:
Login URL: Enter the URL used to sign in to the application.
Verification URL: The Verification URL is an optional page that Cyrisma can use to confirm that authentication was successful. Enter a URL that the account can access only after signing in, such as an account or dashboard page.
Username: Enter the username or email address for the account.
Password: Enter the password for the account.
Username placeholder: Enter the exact field name or token in the login request that is replaced with the username.
Password placeholder: Enter the exact field name or token in the login request that is replaced with the password.
Logged-in indicator: Enter optional response text or a pattern that confirms the account is signed in.
Logged-out indicator: Enter optional response text or a pattern that indicates the account is signed out.
Select Save authentication when the configuration is complete.
Username and Password Placeholders
The Username and Password fields contain the actual credentials used to sign in.
The Username placeholder and Password placeholder fields identify what those values are called in the application’s login request. These values must match the corresponding field names or tokens used by the application.
For example, a JSON login request may contain:
{
  "email": "user@example.com",
  "passwd": "ExamplePassword"
}
For this request, enter:
Username:
user@example.comPassword: The account’s actual password
Username placeholder:
emailPassword placeholder:
passwd
The field shown as Email Address on the login page may be called email, username, user_email, or something else in the login request.
Similarly, the password field may be called password, pass, passwd, or another value.
If the login request uses the following form data:
username=user@example.com
password=ExamplePassword
Enter username as the Username placeholder and password as the Password placeholder.
Logged-In and Logged-Out Indicators
The Logged-in indicator can be response text or a pattern that confirms a successful login. Examples include:
LogoutMy AccountDashboard
The Logged-out indicator can be response text or a pattern that indicates the account is not signed in. Examples include:
LoginSign in
These fields are optional.
Schedule the Scan
After adding the target and saving its authentication settings:
Select Schedule.
Enter a Scan Name.
Select Run Now or Recurring.
If you select Recurring, configure the scan schedule.
Optionally enable Notify on Completion.
Select Submit.